I have had several requests for a tutorial on how to make my Rainbow Starburst String Block that I have had both my BeeJeebers Bee and my Stash Bee mates make for me. I just love the way this looks and I hope you enjoy making 1 or 2 or a whole quilts worth as well!

Step 1: Cut 4 8.5in squares out of your background fabric.

Step 2: Mark 2 dots, each one 3 inches away from the same corner on 2 sides of the blocks.

Step 3: Draw a line from each dot to the opposite corner of the block, making a V shape. Repeat for remaining 3 blocks.

Step 4: Lay your 4 blocks out with the large wedges towards the middle and label the color you want each of the sections to be. For a rainbow block I labeled as follows:
-Orange
-Yellow
-Green
-Aqua
-Blue
-Purple
-Pink
-Red


Step 5: Start with one quadrant and gather 4-6 1\”-2\” strips of fabrics for the corresponding colors. You will need lengths varying between 2\”-11\” of each color. I\’m starting with the Orange/Yellow quadrant.

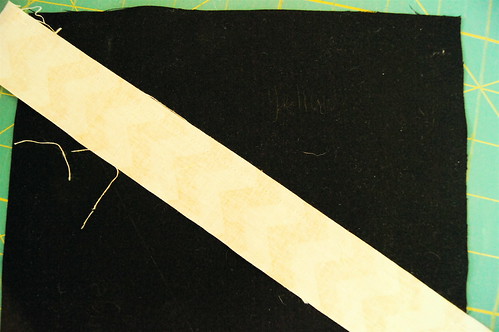
Step 6: Take your longest strip of one color and lay it against the line separating that color from your background fabric. Make sure the fabric is laying on the background side of the line.

Step 7: Sew with a 1/4 in seam on the side that is against the line. Do not sew on the line.
Step 8: Fold back string over seam and press.

Step 9: Line up you next longest strip of the same color, right sides together and sew along the unsewn edge with a 1/4 in seam. Fold over and press.


Step 10: Repeat until you have fully covered that side of the block.

Step 11: Do the same thing for the other side of the block. Make sure to place your first strip along the background side of the line. Sew 1/4 in seam, fold, and press.

Note: The corners will not match up on the corner that the two color meet. Make sure to follow the line your marked and not to match the corners. 
Step 12: Lay your next strip down along the unsewn edge of the longest strip and sew, fold, press. Repeat until you cover all the background fabric on that side.

Step 13: Flip the square over and trim to 8.5in x 8.5in square, following the lines of the background fabric.


Step 14: Repeat this process for the remaining 3 quadrants.
Step 15: Lay blocks out in ROYGBIV layout and sew the top two blocks together. Make sure to match the edges of the colors together. Then sew the bottom two together. Press seams open


Step 16: Sew the two rows together, again making sure the points of the colors match up. Press seams open. Your block is complete!


Colby, this is really great! Do you have any photos of a finished quilt using this block?
LikeLike
Beautiful
LikeLike
Very pretty design! I am currently working on using up scraps in clever ways to create several quilt designs. This will definitely be one of the designs I will make. Thank you for sharing!
LikeLike